

tbCLI and ODBC
This chapter describes how to integrate tbCLI and ODBC.
ODBC
ODBC is a database API which complies with the following Call-Level Interface (CLI) specification and standards.
The Open Group CAE Specification "Data Management: SQL Call-Level Interface (CLI)"
ISO/IEC 9075-3:1995 (E) Call-Level Interface (SQL/CLI)
If ODBC is used, user can access various vendors' DBMS with the same application program. To do this, a separate module or driver for accessing each database is required as well as ODBC software.
tbCLI and ODBC Integration
tbCLI complies with Call-Level Interface (CLI) specification and standards, therefore it can integrate with ODBC. tbCLI is implemented according to ODBC 3.51 standards, therefore it can use ODBC features, such as database trace log.
For ODBC integration, Tibero provides ODBC drivers for each operating system.
Installation on Windows
Tibero provides two ODBC driver installation executable files for installing Tibero 7 ODBC Driver in Windows:
Win32 tbodbc_driver_installer_7_32.exe
Win64 tbodbc_driver_installer_7_64.exe
Tibero also provides the libtbcli.dll ODBC client library file for Win32/Win64. These two files are located in the following directory.
For Windows distribution versions
Win32
%TB_HOME%\bin\tbodbc_driver_installer_7_32.exe
%TB_HOME%\bin\libtbcli.dll
Win64
%TB_HOME%\bin\tbodbc_driver_installer_7_64.exe
%TB_HOME%\bin\libtbcli.dll
For Unix distribution versions
Win32
$TB_HOME/client/win32/bin/tbodbc_driver_installer_7_32.exe
$TB_HOME/client/win32/lib/libtbcli.dll
Win64
$TB_HOME/client/win64/bin/tbodbc_driver_installer_7_64.exe
$TB_HOME/client/win64/lib/libtbcli.dll
Installation
The following is the Win32 driver installation process.
Copy the Win32 libtbcli.dll file to the installation folder. Dynamically link the libtbcli.dll file from ODBC Data Source Manager.
Open a command prompt window (cmd.exe) and execute the following command.
%TB_HOME%\bin\tbodbc_driver_installer_7_32.exe -i [Installation Path]Enter the absolute path where the libtbcli.dll file exists. If the installation path is not specified, the file is installed in %TB_HOME%\bin, the default folder.
Installation check
Execute ODBC Data Source Administrator. Select [Control Panel] > [Administrative Tools] > [Data Source (ODBC)] menu or execute the odbcad32.exe file in the %SystemRoot%\system32 folder. If the Win32 driver is installed on a 64 bit-machine, the odbcad32.exe file must be executed in the %SystemRoot%\SysWOW64 folder.
Move to the [Drivers] tab, and check if Tibero 7 ODBC Driver exists.
[Figure 3] Tibero 7 ODBC Driver intallation check

DSN Registration
If Tibero 7 ODBC Drive is successfully installed, register Data Source Name(DSN) through this driver to store database connection information.
DSN can be registered in the following two ways.
User DSN The DSN can be used only by the windows account user that is currently logged in.
System DSN The DSN can be used by any windows account user.
The registration order is as follows.
Execute ODBC Data Source Administrator.
Move to the [User DSN] tab, and click the [Add] button.
[Figure 4] User DSN - Add

Select the installed Tibero 7 ODBC Driver, and click the [Finish] button.
[Figure 5] User DSN - Tibero 7 ODBC Driver selection

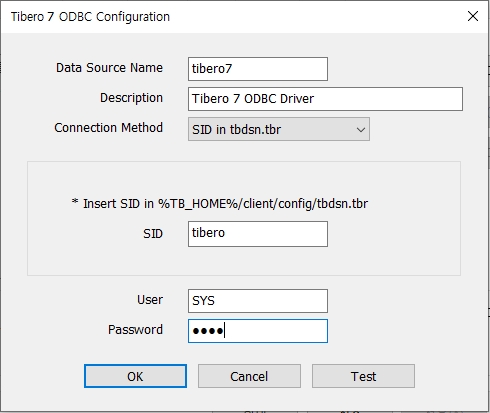
1. Tibero 7 ODBC Configuration dialog box appears. Enter the database connection information in the dialog.
Tibero 7 ODBC Driver offers two ways; Access with IP and PORT, and access with the SID configured in the tbdsn.tbr file.
The IP/PORT method can easily use the driver without building the TB_HOME environment, but it cannot use functions such as setting TB_NLS_LANG in the tbdsn.tbr file.
[Figure 6] User DSN - Database connection information input (IP, PORT type)

[Figure 7] User DSN - Database connection information input (SID type)
After entering all the database connection information, click the [OK] button. If registration is successfully completed, the newly registered DSN is displayed.
[Figure 8] User DSN - Registration Complete

When DSN registration is complete, 'tibero7' can be used in the SQLConnect or SQLDriverConnect function, and it can access a database through the function.
Installation on UNIX
In Windows, if the operating system is installed, ODBC driver manager is automatically installed, but in Unix environments, ODBC must be installed separately. There are various types of ODBC driver managers, such as unixODBC, and iODBC.
Basic Environment Configuration
In order to install iODBC, the basic environment should be configured as follows: Basic environment can be configured in the following order.
Check if the libtbodbc.so file exists in the $TB_HOME/client/lib (or $TB_HOME/client/lib32) directory. Check this as follows:
$ file libtbodbc.so
libtbodbc.so: ELF 32-bit LSB shared object, Intel 80386,
version 1 (SYSV), not stripped
Add the libtbodbc.so file path in the LD_LIBRARY_PATH environment variable. However, depending on a specific machine, other environment variables instead of LD_LIBRARY_PATH can be used. For example, AIX 5.2 machine uses a LIBPATH environment variable.
iODBC installation
iODBC installation differs depending on the CPU that the installed version of Tibero supports.
32-bit When installing iODBC, if a separate option is not given, iODBC is installed as 32-bit regardless of Tibero installation version. For example, if a prefix option is not given as follows, iODBC is installed in the /usr/local folder.
export CC=cc
./configure [--prefix=/usr/local] --sysconfdir=/etc --disable-gui
make
make install
64-bit iODBC is compiled as 32-bit by default. Thus when using Tiberowhich is operating on a 64-bit machine, the compilation option should explicitly be given to install the 64-bit iODBC. The followings are examples show how to install iODBC by the type of machine.
HP-UX
export CFLAGS=+DD64
export CC=cc
./configure [--prefix=/usr/local] --sysconfdir=/etc --disable-gui
make
make install
AIX
export CFLAGS=-q64
export CC=cc
./configure [--prefix=/usr/local] --sysconfdir=/etc --disable-gui
make
make install
iODBC installation check
After installing iODBC, check if compilation was successful by using the file command.
The following is an example that shows how to check if the installed version of iODBC was successfully compiled.
$ file libtbodbc.so
libtbodbc.so: ELF 32-bit LSB shared object, Intel 80386,
version 1 (SYSV), not stripped

$ file libiodbcinst.so.2.1.18
libiodbcinst.so.2.1.18: ELF 32-bit LSB shared object, Intel 80386,
version 1 (SYSV), not stripped
iODBC Environment configuration for Tibero
Apply environment configuration to the installed iODBC as follows:
Configure the ODBC driver. Create the odbc.ini file in the /etc directory by referring to the following example.
<<odbc.ini>>
[ODBC Data Source]
Tibero7 = Tibero 7 ODBC Driver

[ODBC]
Trace = 1
TraceFile = /tmp/odbc.trace

[Tibero7]
Driver = /home/tibero7/client/lib/libtbodbc.so
Description = Tibero7 ODBC Datasource
SID = tibero ; DSN information configured in the tbdsn.tbr file.
User = tibero
Password = tmax
The odbc.ini file configures the whole system. In order to configure separate ODBC drivers for users, write the $HOME/.odbc.ini file as in the previous example.
Configure the ODBC data source.
Create the odbcinst.ini file in the /etc directory by referring to the following example
<<odbcinst.ini>>
[Tibero 7 ODBC Driver]
Description = ODBC Driver for Tibero 7
Driver      = /home/tibero7/client/lib/libtbodbc.so
UsageCount  = 1
Register the ODBC driver and ODBC data source, which were created in the 1st and 2nd steps above, to iODBC manager.
iodbc-config --odbc.ini --odbcinst.iniDatabase connection check
After completing the environment configuration in iODBC, execute the following commands to check if the database is connected.
iodbctest "DSN={dsn};UID={user};PWD={pwd}"dsn
DSN name
user
User account name to access
pwd
User account password to access
The following is an example that shows how to check database connection by using the iodbctest command.
$ iodbctest "DSN=Tibero7;UID=tibero;PWD=tmax"
iODBC Demonstration program
This program shows an interactive SQL processor
Driver Manager: 03.52.0607.1008
Driver: 06.00.0000 (libtbodbc.so)

SQL>select * from dual;

DUMMY
------
X

result set 1 returned 1 rows.

SQL>
Note that when the iodbctest command is executed, if database connection information exists in both the /etc/odbc.ini and $HOME/.odbc.ini files, the $HOME path is searched first. If the ODBCINI environment variable is specified, the odbc.ini file configured in the ODBCINI environment variable is searched first.
tbdsn.tbr and ODBC Data Source Administrator
tbCLI can bring database connection information with the following two ways.
tbdsn.tbr
tibero=(
        (INSTANCE=(HOST=12.34.56.78)
                  (PORT=8629)
                  (DB_NAME=tibero))
)
ODBC data source manager DSN
To view the database connection information from the ODBC that was installed in Windows tbCLI or in Unix (including Linux), search the ODBC Data Source Administrator.
If the information does not exist in ODBC Data Source Administrator, database connection information is searched by searching the tbdsn.tbr file. In tbSQL utility that uses tbCLI, database connection information is retrieved through the same process.
Last updated